Pages

Thursday 16 April 2015

Customize TIBCO Admin UI with your own images

We can customize TIBCO Admin UI panel by changing images under path

<TIBCO_Home>administrator\<Version>\tomcat\webapps\administrator\jsp\com\tibco\administrator\<Folder>\Image.gif>

Below are the few Admin UI images.


Friday 13 March 2015

Java Code to decrypt encrypted passwords

package ProcessDefinition;
import java.util.*;
import java.io.*;
import com.tibco.security.ObfuscationEngine;
public class ProcessDefinitionJavaCode{
/****** START SET/GET METHOD, DO NOT MODIFY *****/
protected String Input = "";
protected String Output = "";
public String getInput() {

return Input;
}
public void setInput(String val) {
Input = val;
}
public String getOutput() {
return Output;
}
public void setOutput(String val) {
Output = val;
}
/****** END SET/GET METHOD, DO NOT MODIFY *****/
 public ProcessDefinitionJavaCode() {
 }
 public void invoke() throws Exception {
/* Available Variables: DO NOT MODIFY
In  : String Input
Out : String Output
* Available Variables: DO NOT MODIFY *****/
String var = new String(ObfuscationEngine.decrypt(Input));
 Output=var;
}
}


Sunday 1 June 2014

Oracle 11G R1 Installation

Download Oracle 11g installation software from the following link http://www.oracle.com/technetwork/database/enterprise-edition/downloads/index.html
Downloaded file will be in the ZIP format.Extract it into one folder.
Now run the setup.exe file in the software then you are able to see the following screen.
When following screen appears mention the path that at where you want to install your oracle software


Then in the following screen you have verify some warnings and errors by checking the check-boxes


Click on NEXT


Click on INSTALL


When you see the following screen Click on the PASSWORD MANAGEMENT.
In the following screen we have to unlock the users like scott and hr etc.


Uncheck the scott user and provide password in both password tab and confirm password tab.
Here i have provided password as "tiger".


Click on EXIT


Click on Yes.

Now your oracle software installation was successfully done.
By default you will get two DB tools for oracle 11g 32bit software.They are 

                                1)SQL developer
                                 2)SQL Plus
SQL plus command prompt user interface and sql developer is graphical user interface.


If you want to work with SQL developer you need to install java in your machine

Click on SQL developer which is in the windows start menu.

When following screen appears click on browse button and choose java.exe which is in the JDK folder.


Here we have to create connections for user system as sysdba and for scott as normal user
Right click on the connection which is the left panel of screen.and click new connection
Provide details as mentioned below default password for sys and system user is our SID.here my SID is "orcl".


Test the connection and save the connection if test is succeeded.

Now create the connection for scott user and provide the password that which you gave in the password management.
I have provided password as "tiger" in password management.


Test the connection and save the connection if test is succeeded.


Sql developer configuration is successful.

Thursday 15 May 2014

SQL SERVER 2008 INSTALLATION


Click On Installation


Click on “New SQL Server Stand Alone Installation or Add Features to An Existing Installation”


Click On OK Button


Click On Next.


Check the options----Accept License terms and Send Feature usage data…… (optional )!and Click NEXT.


Click on Install Button to setup all supporting files.


It will wait for processing…


Click ‘Next’ to setup Support Rules.


Check the Radio Button SQL Server Feature Installation and click ‘NEXT’.


Click on “Select all” and Click “NEXT”.


Click “NEXT” to Install Rules.


Select Default Instance and click “NEXT”


Click “NEXT” to check disk space requirements.


Click on button Use the same account for all the services and select

“NT AUTHORITY SYSTEM” and click “OK”.


Click “NEXT” for server configuration.


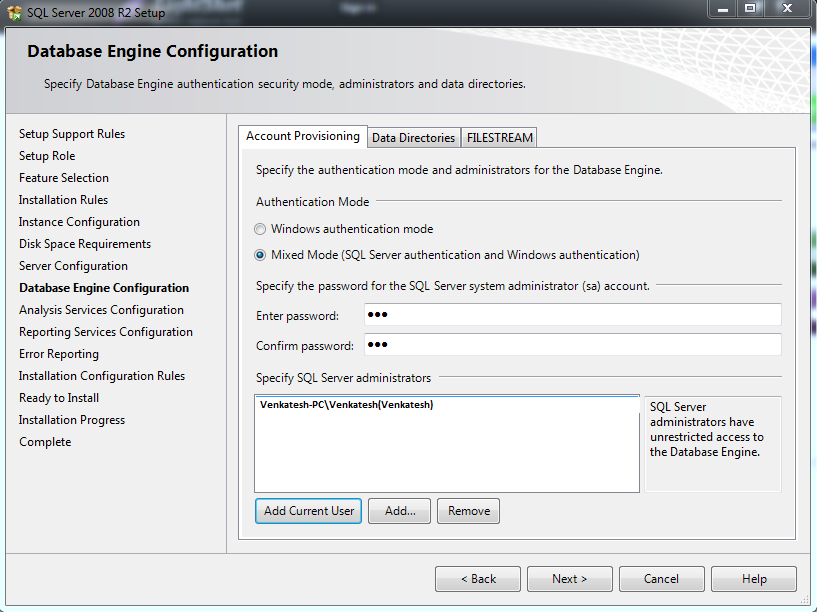
Select “Mixed Mode” and provide password for ‘sa’ user account.


Click on Add Current User and then click “NEXT.”


Click on Radio Button Install the native mode default configuration and Click “NEXT” .


Click “NEXT”.


Installation Successful.